
How to Clean Outdoor Patio Tiles Without Damaging Grout
In this article
A pressure washer can clean outdoor patio tiles, but excessive pressure can roughen the surface or damage grout. If you’re learning how to clean outdoor patio tiles, start by sweeping, then use water and a soft brush. Reserve pressure washing for suitable tiles, using low to medium pressure and keeping the nozzle at a distance. For routine dirt, gentle cleaning is often enough.
A fast, powerful clean can seem tempting, especially when grime or algae has settled into the grout. The key is to match the method to the tile material and the type of dirt. That way, you can lift deposits without wearing down the joints or harming the finish.
This guide covers a careful cleaning sequence, ways to treat common outdoor stains, and when pressure washing may be suitable. It also explains how to manage rinse water on balconies to help prevent pooling.
Key Takeaways
- Match the cleaning method to the tile material, and use pH-neutral products on natural stone to avoid surface damage.
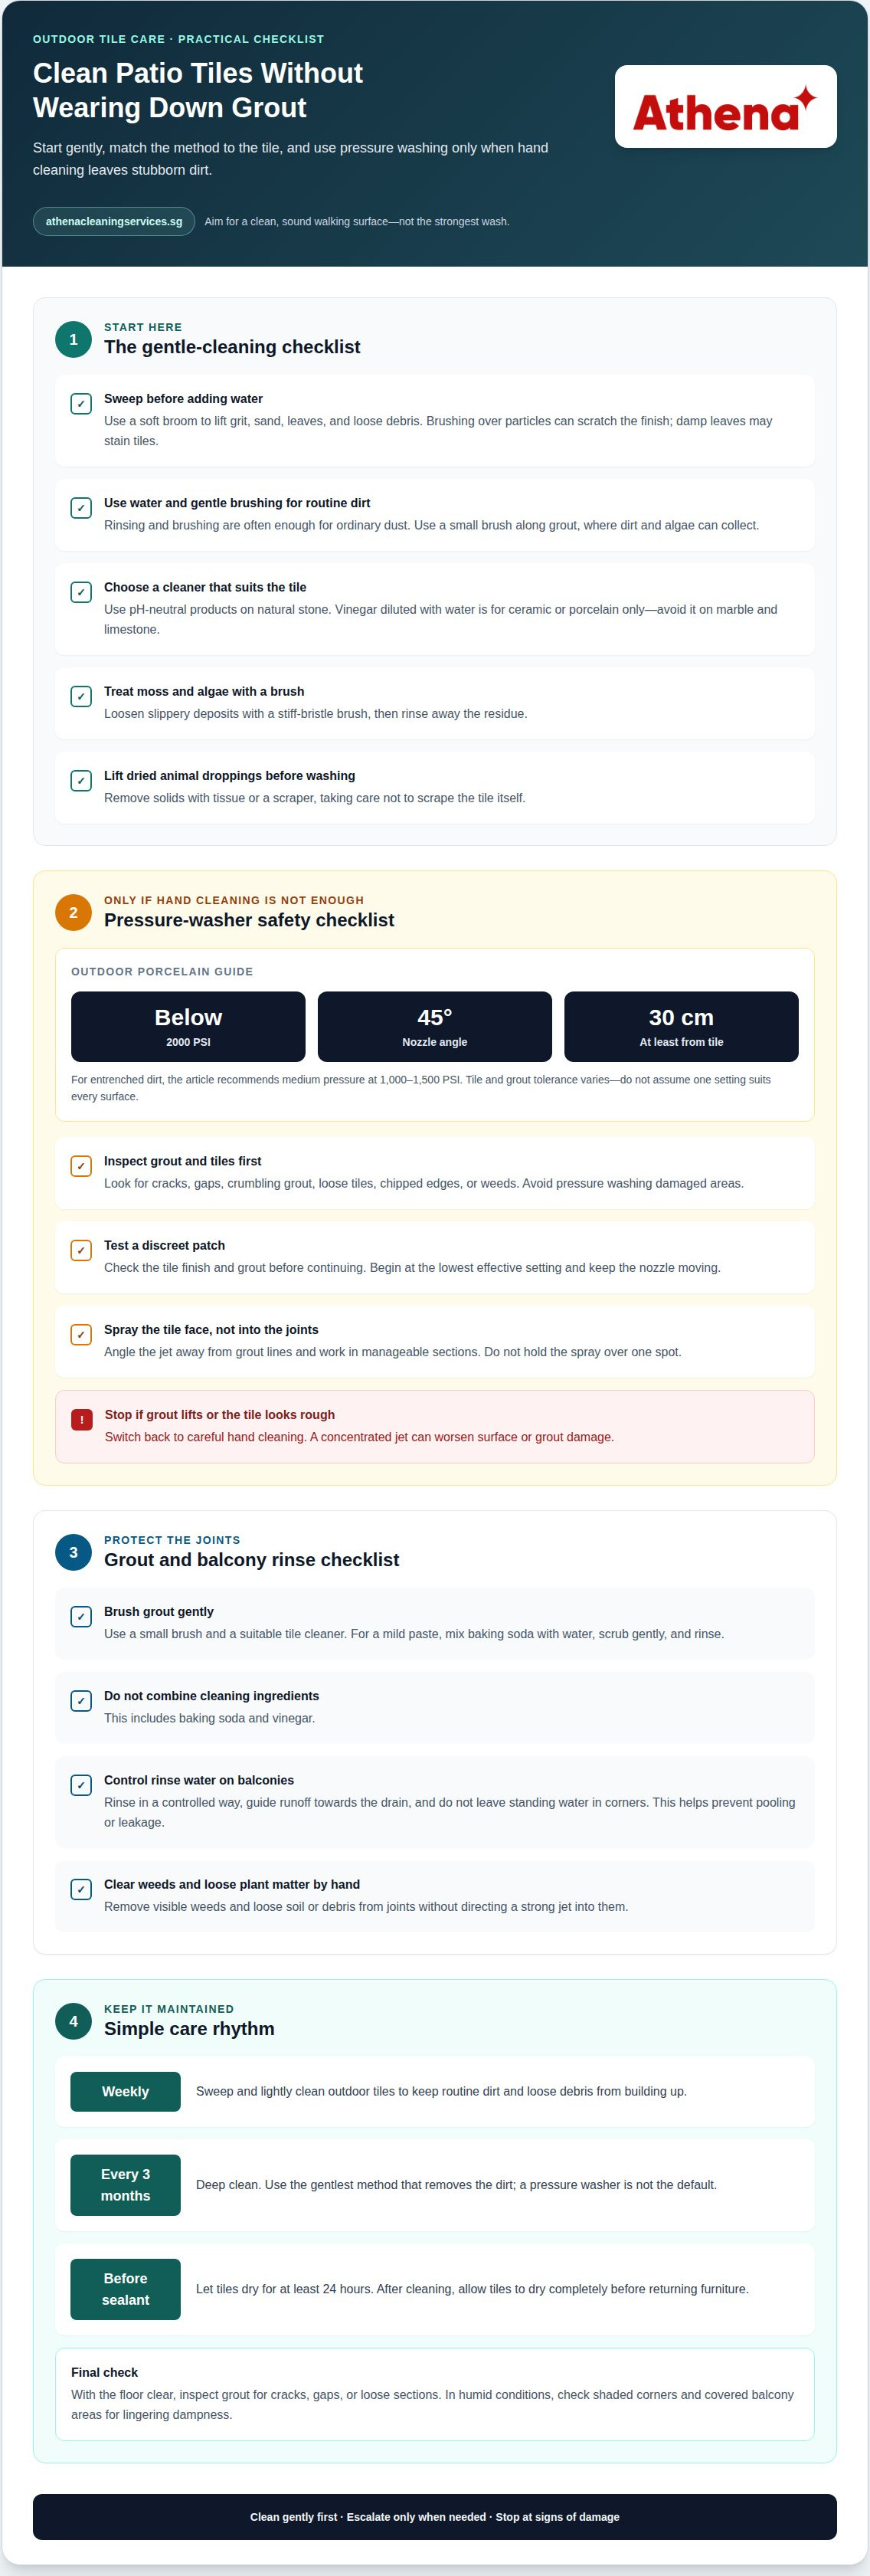
- For porcelain, keep pressure below 2000 PSI, angle the nozzle at 45 degrees, and hold it at least 30 cm from the tiles.
- Loosen moss and algae with a stiff-bristle brush, then rinse away residue to help clear slippery deposits.
- Use vinegar only on ceramic or porcelain tiles, diluted with water; avoid it on marble and limestone.
- Clean grout gently with a small brush and the same suitable solution used on the tiles.
Can I use a pressure washer on outdoor tiles?
- Use a pressure washer cautiously. A strong jet can roughen tile or damage grout, particularly when the nozzle is held close. If you’re deciding how to clean outdoor patio tiles, begin with a broom, water, and gentle brushing. Use a washer only for stubborn dirt that hand cleaning has not removed. Avoid directing the jet at cracked tiles or loose grout, as this can worsen existing damage.
- Sweep before wet cleaning. Use a soft broom to remove grit, sand, and loose debris. Brushing over particles can scratch the finish. Clear fallen leaves regularly, as damp leaves may stain tiles. For dried animal droppings, lift the solids with tissue or a scraper before washing the mark. Take care not to scrape the tile itself.
- Choose a suitable cleaning time. A dry, mild day without direct sunlight can help a cleaner work evenly and reduce streaking. Dilute a suitable product as directed, then scrub gently. On a balcony, rinse in a controlled way to prevent pooling or leakage. Guide runoff towards the drain, and do not leave standing water in corners.
- Keep routine maintenance simple. Sweep and lightly clean outdoor tiles weekly, then deep clean every 3 months. For many patios, rinsing and brushing remove ordinary dust without a pressure washer. Use a small brush for grout lines, where dirt and algae can collect. This routine helps keep the walking surface clear and prevents deposits from building up between deeper cleans.
- Finish with a seasonal check. Let tiles dry completely before returning furniture, so moisture isn’t trapped underneath. Inspect grout for cracks, gaps, or loose sections while the floor is clear. Before applying sealant, leave the tiles to dry for at least 24 hours. In Singapore’s humid conditions, check shaded corners and covered balcony areas for lingering dampness.
A pressure washer is an option, not the default. Gentle cleaning is often enough for routine dirt. If you’re considering how to clean outdoor patio tiles with a washer, use low to medium pressure, keep the nozzle at a distance, and move it steadily. If grout starts to break away or the tile surface looks rough, stop and switch to hand cleaning.
Before using a pressure washer, weigh the potential cleaning benefit against the condition of the tiles and grout. If the surface is already damaged, or gentler cleaning has removed the dirt, a stronger jet may not be needed. Watch how the surface responds instead of washing the whole area at one setting. Stop at any sign of roughening or grout loss, and return to careful hand cleaning.
Regular cleaning of outdoor tiles improves safety, maintains their appearance, and helps extend the surface's life. Keep that purpose in mind when choosing a method: the aim is a clean, sound walking surface, not the most forceful wash. A measured approach also makes it easier to notice wear and address it during routine care. For ordinary upkeep, choose the gentlest method that does the job, and reserve pressure washing for dirt that remains after other cleaning.
Pressure washing and grout protection
Pressure washing can remove stubborn dirt, but a concentrated jet may damage tiles and grout. Experienced exterior cleaners, such as professionals providing pressure washing Jacksonville FL, protect the joints by using restrained pressure, keeping the nozzle moving, and stopping if grout starts to break away.
Pressure Wash Outdoor Tiles
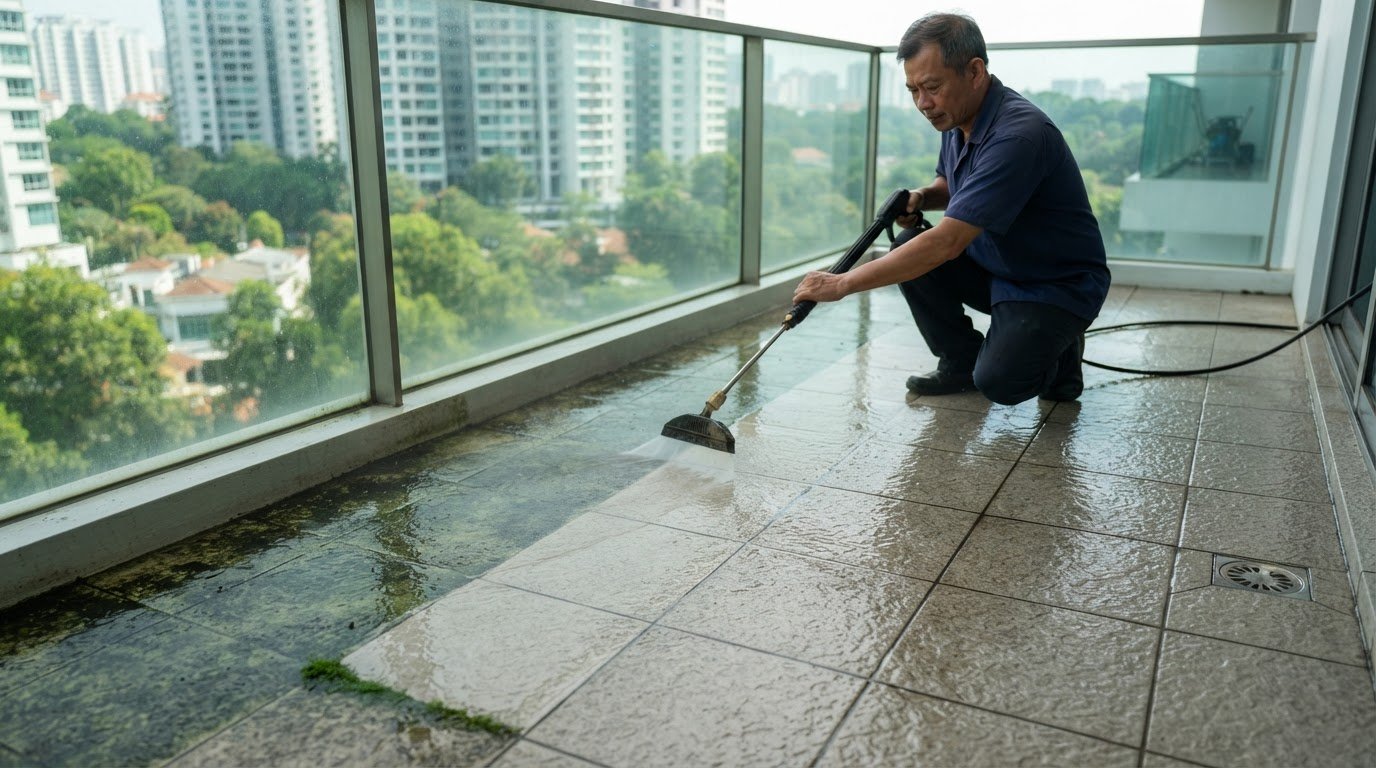
Begin with the lowest effective setting and keep the nozzle moving across the surface. For outdoor porcelain, stay below 2000 PSI, angle the nozzle at 45 degrees, and hold it at least 30 cm from the tiles. Avoid directing the jet into grout lines, chipped edges, or loose tiles; these vulnerable areas can deteriorate under concentrated force.
Clean Grout and Prevent Weeds
Use a small brush and a suitable tile cleaner to work gently along grout lines. Pull visible weeds by hand, and clear loose soil and plant debris from the joints. For a mild scrubbing paste, mix baking soda with water, apply it with a soft brush, then rinse. Do not combine cleaning ingredients, including baking soda and vinegar.
- Inspect the joints before washing. Look for gaps, crumbling grout, loose sections, and weeds between tiles. Avoid pressure washing damaged areas, as a strong stream can remove more grout or push debris deeper into a joint. Brush fragile spots by hand, then check the surface again once it has dried.
- Choose pressure according to the dirt and tile. For entrenched dirt, medium pressure at 1,000-1,500 psi is recommended. Outdoor porcelain can be jet washed below 2000 PSI, with the nozzle angled at 45 degrees and held at least 30 cm away. Don’t assume every tile material or grout joint tolerates the same setting.
- Test a discreet patch first. Wash a small, inconspicuous area and check the tile finish and grout before continuing. Keep the nozzle moving instead of holding it over one spot. If the surface looks rough or grout starts lifting, stop using the washer and switch to gentle brushing.
- Work across the tiles, not into the joints. Direct the spray at the tile face and angle it away from grout lines. Rinse in manageable sections so loosened dirt does not settle back into the joints. On a balcony, control the rinse water to prevent pooling and guide runoff towards the drain.
- Choose hand cleaning for delicate grout. Apply a suitable cleaner to the tile and use a small brush along the joints. To use baking soda, mix it with water into a paste, scrub gently, and rinse away the residue. Washing soda is a different cleaning ingredient, so do not substitute it without checking that it suits the tile and grout.
- Finish by clearing joints and checking the result. Remove visible weeds and loose plant matter by hand, then brush away soil around the grout. Rinse off cleaning residue and inspect the joints once the surface dries. For stubborn deposits or a large paved area, professional pressure washing can help tackle the cleaning with a controlled approach.
Can I Jet Wash Outdoor Porcelain Tiles?
Jet washing may help remove stubborn deposits from outdoor porcelain, but moss, grease, and algae need targeted treatment. Start with a brush and suitable cleaner, then see whether rinsing removes the residue.
Remove Algae, Moss, and Lichen
Brush moss, algae, or lichen gently with a stiff-bristle brush, working across the tile rather than forcing deposits into joints. For algae or moss on ceramic or porcelain, apply white vinegar diluted with water at a 1:5 ratio. Leave it for 15 minutes, scrub gently, then rinse thoroughly. Don’t use vinegar on natural stone such as marble or limestone.
Remove Oil, Grease, and Slippery Deposits
Blot fresh oil or grease before spreading it across the tile; use absorbent paper or cloth. For a small grease spot, leave fresh lemon juice on the area for 5-10 minutes, then brush lightly and rinse. Treat slippery deposits by removing the visible film with a brush and appropriate cleaner. Rinse away residue, since leftover cleaner can leave the surface slick.
Prevent Algae and Moss Buildup
Clear fallen leaves regularly, especially from shaded corners and around planters. Damp leaves can stain tiles and allow organic deposits to collect. Remove debris from grout lines, then rinse away loosened dirt. In humid conditions, check covered or shaded areas for recurring growth and clean early, before moss spreads.
- Clear loose debris first. Sweep leaves, soil, and grit off the porcelain before wet cleaning. This reduces the chance of dragging debris across the tile while brushing. Remove plant matter from corners and joints, where damp material can collect and hide early moss growth.
- Test the cleaner on a discreet tile. Apply the diluted solution to an inconspicuous spot and check the surface. Use vinegar only on ceramic or porcelain, not marble or limestone. For natural stone, choose a pH-neutral cleaner instead of an acidic product.
- Work on one small patch at a time. Apply cleaner to the affected area, let it work for the stated period, then brush gently. For the vinegar-and-water treatment, use the 15-minute dwell time. Small patches make it easier to see whether algae or moss has lifted.
- Rinse before checking the result. Wash away loosened algae, grease, and cleaner residue. Look at the tile from different angles to check for any remaining slippery film. Brush stubborn deposits gently again instead of immediately increasing the pressure.
- Let the cleaned area dry before use. Keep people off wet tiles, particularly if algae or cleaner residue may remain. Once dry, inspect shaded grout lines and the edges of planters. Remove new leaves promptly to reduce staining and catch returning growth while it is still localised.
How to clean tiles with White Vinegar & Water?
Choose a cleaner according to the tile material and the mark you’re treating. Vinegar may suit ceramic and porcelain, but acidic products can damage natural stone.
-
Use Vinegar on Outdoor Tiles
Mix one part vinegar with four parts water for acid-resistant patio tiles. Apply the solution to ceramic or porcelain, then let it work for 10 to 15 minutes before scrubbing. Use a soft brush and rinse the tile thoroughly. Don’t apply vinegar to marble, limestone, or other natural stone, where acid can attack or bleach the surface.
-
Choose a Cleaning Solution
For general dirt, prepare soapy water using 5 liters of warm water and mild soap. Apply it with a brush, then rinse away loosened soil. Baking soda can help with spot cleaning, but use it gently and remove all residue. For grease, fresh lemon juice is another spot treatment; brush lightly after it has worked, then rinse clean.
-
Consider Acid-Sensitive Stone
Identify the tile before choosing an acidic cleaner. Marble and limestone are natural stone, and vinegar can attack or bleach their surfaces. Use a pH-neutral product or mild soap and water instead. Test the solution on a discreet spot, then check for changes in colour or finish before cleaning the wider area.
- Clear grit before applying liquid. Sweep the patio first, especially along grout lines and beside planters. Loose sand can scratch tiles when brushed across the surface. Remove visible debris, then dampen a small section with clean water. This can help show whether the mark needs targeted treatment or ordinary soapy washing.
- Apply cleaner in manageable sections. Work across one area at a time, using a small brush for grout and a larger soft brush for tile faces. Follow the 10 to 15 minute working time for suitable patio cleaning products, without letting a solution dry on the surface. Rinse thoroughly and let the tiles dry before judging the result.
For acid-resistant patio tiles, use a vinegar cleaning solution at 1:4. Mix only what you need for the area you are cleaning, and apply it in manageable sections so you can scrub and rinse each part before moving on. Use a soft brush rather than a rough tool, particularly around grout lines. Keep the solution off surfaces that may be natural stone, and do not allow it to dry on the tile. After scrubbing, rinse thoroughly with clean water and let the surface dry before checking whether any marks remain.
Clean natural stone patio tiles with pH-neutral products, as acidic cleaners can attack or bleach the surface. If you are unsure what the tile is made of, avoid vinegar until you have identified it. Choose a pH-neutral cleaner or mild soap and water, and test it on a discreet spot first. Check for changes in colour or finish before treating the wider area. Clear loose grit before brushing, use a soft brush, and rinse away the cleaner and residue. Once the tiles are dry, assess the result and repeat only with a suitable product if needed. Match the method to the tile instead of relying on one solution for every surface. For delicate exterior stone that cannot tolerate abrasive scrubbing or aggressive jet washing, masonry restoration specialists like Surfprep often rely on gentle superheated steam systems to lift grime without surface wear.
Outdoor tile materials and their care needs
Choose a cleaning method and product that suit the tile. Material, stains, grout condition, and sealing needs all affect how to care for the surface.
Clean Tiles and Prevent Slipping
Identify the tile, then sweep away loose debris before washing. Porcelain absorbs relatively little water and is resistant to stains, so mild detergent, a pH-neutral cleaner, and light scrubbing are generally suitable. Clean away algae or greasy residue that could make the surface slippery, then rinse thoroughly to remove any cleaner left behind.
Use Outdoor Tile Cleaners and Sealers
Choose a neutral-pH cleaner or soap-and-water solution for most patio materials. Natural stone needs particular care because acidic or harsh products can attack or discolour the surface. An outdoor porcelain tile and grout sealer can help reduce future stains and water penetration. Follow the sealer’s directions, and apply it only when the cleaned tiles are fully dry.
- Identify the tile material. Check whether the patio is porcelain or natural stone before choosing a cleaner. Porcelain usually tolerates mild detergent and light scrubbing, while natural stone needs pH-neutral products. If you are unsure of the material, avoid acidic cleaners and start with a neutral solution on a discreet area.
- Clean from loose dirt to visible stains. Sweep the surface, then wash a small area with a suitable tile cleaner. Use a soft brush on the tile faces and a smaller brush near the grout. Rinse away loosened dirt and cleaner, as residue can leave a film underfoot. Keep the walking area clear until it dries.
- Check joints and seals regularly. Inspect outdoor tile joints and seals every two to three years. Look for gaps, crumbling grout, or worn-looking sealant. Addressing these signs helps maintain the tiled surface and identify areas that need attention before you apply another cleaning product or sealer.
- Set a resealing schedule based on use. Reseal high-traffic outdoor tile areas and pool decks every 12 months. Reseal outdoor patios and walkways every 18-24 months, or when water stops beading on the surface. Let cleaned tiles dry for at least 24 hours before applying sealant, so moisture isn’t trapped underneath.
- Get help with a larger cleaning project. For tiled areas that need more than routine care, arrange professional tile cleaning to address built-up dirt with a considered approach.
Make your next clean easier
Turn what you’ve learned about how to clean outdoor patio tiles into a simple record for future care. Note the tile material, which cleaner worked, and where algae or stains return. This makes it easier to repeat a suitable method and avoid treatments that do not suit the surface.
Consider how the patio fits into the upkeep of the wider property. A shared outdoor area may need attention alongside the floors and furnishings used every day. Planning these tasks together can make maintenance more manageable and help keep the whole space cared for.
If you’d like support with property cleaning and upkeep, contact Athena Team Cleaning to discuss your needs. Contact Athena Team Cleaning and take the next step towards a cleaner, more welcoming space.
Use a pH-neutral cleaner or mild soap solution for most outdoor tiles. Match the product to the material: porcelain generally suits mild detergent, while natural stone needs a pH-neutral option. For a small mark, test the cleaner on a discreet spot first. Do not choose a product solely because it promises powerful stain removal, as harsh chemicals can discolour or damage natural stone.
When Should You Clean the Patio Tiles, and Why is Regular Cleaning so Important?
Clean when you see loose debris, stains, algae, or residue making the surface slippery. Regular care removes deposits before they spread into grout or become harder to lift. It also helps keep the patio presentable and supports the surface’s useful life. After heavy leaf fall or a spill, spot-clean promptly rather than waiting for the next full wash.
Frequently Asked Questions
Outdoor tile cleaner: what should you use?
When Should You Clean the Patio Tiles, and Why is Regular Cleaning so Important?
Related articles